Lock interfaces provide an Add Lock placeholder for adding and configuring the first lock. As each lock is added, another placeholder is provided for any subsequent locks based on the number of locks the lock interface supports.
Changing the number of locks, regardless of their online or offline status, may affect the system operating costs. Contact your VAR for more information.
To add a lock, perform the following steps:
- From the sidebar, select Devices to display the device tree.
- Select the Add Lock placeholder or select
 then choose Configure.
 - Enter a Name for the lock. This name is used when assigning locks to spaces, when monitoring alarms, and elsewhere in the system.
- Lock device id: Enter the 6-digit hexadecimal number from the Aperio Programming Application:
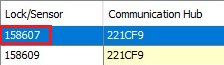
Lock number: This number is based on the order in which the locks are paired as shown in the in the Aperio Programming Application. The first lock is Lock number "0" followed by the other locks (Lock number "1", etc.).
- From the Lock function drop-down, choose "Privacy mode" or "Escape and return". Privacy mode allows an occupant of a room to lock the door and change the access rights to the room. It is supported on locks equipped with a privacy mode button or a monitored deadbolt. See Aperio Lock Functions to learn more.
- Allow authorized access to locked door is enabled
 by default. This allows people with special access to open this door when it is locked. Special access must be authorized for people via People Groups. Select to disable
  this option.
 - Configure the lock's reader modes:
- (Optional) Choose a Schedule to associate it with reader modes and then choose a Scheduled reader mode and Off schedule reader mode. (See Aperio scheduled lock modes for more details.)
- Choose a Default reader mode. This mode specifies how the lock behaves when it is online and communicating with the access controller when no schedule is selected. Default reader mode only appears if the Schedule is set to "None". Most of the modes are self-explanatory, except for "Facility code only" which means the access grant decision is based on the facility code setting for the card format.
- Configure double card presentation:
- Select
 to enable
  Double Card Presentation. In addition to configuring the lock, double card presentation must be authorized for people via People Groups. (See Double Card Presentation for Aperio to learn more.)
 - Choose the behavior for the lock when a badge is presented twice.
- Unlock until reset (default setting) - The reader mode will be changed to Unlocked, returning to its configured mode when the schedule changes.
- Unlock until manually released - The reader mode will be changed to Unlocked, behaving as a reader mode override that applies until a user releases the reader from the override or an action that is configured by a controller rule triggers the change.
- Unlock for a limited time - The reader mode will be changed to Unlocked, behaving as a reader mode override that applies for a specified time. Select the Duration from the drop-down or enter a custom duration. The maximum duration is 7 days.
Event only- This is intended to be used as an event that will trigger an action (for use in conjunction with controller rules).
The first time a card is presented, it will generate an access event. If the card is presented a second time within 5 seconds of the first presentation, it will trigger a double card presentation. If the person is authorized for double card presentation, the configured reader behavior will take effect.
- Select to enable First Card Unlock. (See First Card Unlock for Aperio to learn more.)
- Select
- Configure door:
- Enter the Held open time. This specifies the number of seconds the door can be held open before an alarm is generated. Held open time can be set from 1 - 32,767 seconds (approximately 9 hours). The default value is 30 seconds.
- Enter the Unlock time. This specifies the number of seconds the door is unlocked when access is granted. Typically, this is set from 5 - 10 seconds but Unlock time can be set from 1 - 255 seconds (4.25 minutes).
- Enter the Extended held open time. This specifies the number of seconds a door is held open for people with Use extended access times enabled. This field is intended for people who need extra time to proceed through a doorway.
- Enter the Extended unlock time. This specifies the number of seconds the door is energized for people with Use extended access times enabled. This field is intended for people who need extra time to proceed through a doorway.
- Configure contact:
- Select to enable
 Ignore door held. When ignored, no "Door Held" events or statuses will be reported for this device.
 - Select to enable Assume door used. All valid card swipes are then reported immediately as “Access Granted - Entry Occurred” events, even if the person did not open the door. If Assume door used is not enabled, “Access Granted - Entry Occurred” is not reported until the person opens the door after a valid card swipe. If the door is not used, the event “Access Granted - No Entry Occurred” is reported.
- Select
 to enable Ignore door forced. When ignored, no "Door Forced" events or statuses will be reported for this device.
- Select
Configure REX: Send REX events is disabled
 by default. This specifies that the "Request to Exit - Door Used" and "Request to Exit - Door Not Used" events will not be sent to reduce clutter in the event feed. Enable this setting to receive REX events in the event feed.
When the Send REX events option is disabled, email notifications will not be sent for the "Request to Exit - Door Used" or "Request to Exit - Door Not Used" events.
- Select Save to save the configuration. If you exit this screen after entering the lock information without saving, you will be prompted to save or discard your changes.
- The controller may need to be synchronized after adding locks.
Lock Actions Menu
The lock action menu can be accessed by selecting  for the lock.
Lock actions include:
- Override Reader Mode: Choose this option to set an override mode on a default or scheduled reader mode. See Reader Mode Override to learn more about setting or releasing a reader mode override.
- Release Override: Choose this option to manually return the reader mode to its normal operating mode from an override mode.
- Temporary Unlock: Choose this option to open a door without presenting a credential. See Unlock a Door to learn more.
- View Details: The View Details option presents read-only lock information. From here you can change the reader mode, set an override to the reader mode, or temporarily unlock the door. See View or Edit Lock Details to learn more.
- Configure: Choose this option to open the lock configure screen and configure a new lock or modify an existing lock configuration.
- Delete: Choose this option to remove the lock.