Configured schedules are used for setting up scheduled reader modes, scheduled access, and camera recording schedules. This is done by assigning a schedule.
When the schedule is active:
- The reader operates according to the scheduled reader modes rather than its default reader mode.
- The people group has access that is limited to the time specified in the schedule.
- The camera records according to a schedule (with a single interval).
- From the sidebar, select Configuration, then Schedules.
- Select Add a Schedule to create a new schedule or choose a schedule to edit it.
- On the schedule details screen, enter a Schedule Name.
- Choose a color to distinguish the schedule from other schedules.
- Define each time interval in this schedule starting with Interval 1.
- Select the Days the interval applies to. Considerations for schedules crossing midnight may apply.
Enter the time the interval applies to:
If the interval applies to the entire day, select to indicate All Day.
If the interval applies to part of a day, enter a Start Time and End Time. The duration time between the start and end of the interval is then displayed.
indicates the time crosses midnight.
- Select the Holiday Rule. (Holiday rules apply to the entire schedule. To learn how holiday rules work, select "What does this mean?".)
- If the schedule does not cross midnight:
- Holidays do not affect this schedule. Selecting this option causes the schedule to be followed at all times. Holidays are ignored.
- Actions based on this schedule will not occur on holidays. Selecting this option means the schedule will not be applied on holidays.
- If the schedule crosses midnight:
- Holidays do not affect this schedule. Selecting this option causes the schedule to be followed at all times. Holidays are ignored.
- Actions based on this schedule will not occur on holidays. Selecting this option means the schedule will not be applied on holidays if the schedule starts during a holiday.
- For more information, refer to Holiday Rule Visualizations.
- If the schedule does not cross midnight:
- Select Add Interval to schedule another interval, and then repeat step 5 for this and each additional interval.
- Up to 6 intervals can be added to a schedule and the intervals may overlap one another.
- For cameras, a schedule may only have one interval.
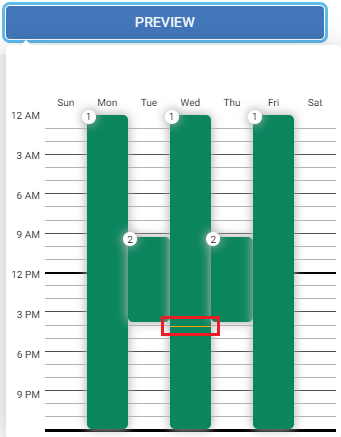
Select Preview for a visual representation of the intervals within a schedule. This example shows a schedule consisting of 2 intervals. The yellow line shows where you currently are in the week and time of day. In this case, it's 4:00 pm on Wednesday.
- Select Save to save your changes. If you exit this screen after the changes are made without saving, you will be prompted to save or discard your changes.
- Each interval of a schedule begins and ends at the start of the specified minute, with 12:00 AM denoting midnight. For example: An interval starting at 7:00 AM and ending at 11:00 PM, begins at 7:00:00 AM and ends at 11:00:00 PM.
- Any changes to a schedule may take place immediately.
Training video: Add a Schedule
Holiday Rule Visualizations
If the schedule does not cross midnight | |
|---|---|
Option A: Holidays do not affect this schedule.
This schedule will run normally and ignore the holiday. | |
Option B: Actions based on this schedule will not occur on holidays.
This schedule will not run normally, and reader modes will remain in their off-schedule state until Thursday when the normal schedule resumes. | |
If the schedule crosses midnight | |
Option A: Holidays do not affect this schedule.
This schedule will run normally and ignore the holiday. | |
Option B: Actions based on this schedule will not occur on holidays.
This schedule will not run normally, and reader modes will remain in their off-schedule state until Thursday at 9PM, when the normal schedule resumes. | |
Related Topics
Configure scheduled reader modes
© 2026 Honeywell International Inc. All Rights Reserved.


